2014年5月31日 星期六

CNC使用說明-XY軸跟Z軸設定方法


咦?不是要教怎麼使用CNC? 怎麼還沒教學,就出現ㄧ堆屑屑?

沒錯!就是要先跟大家提醒,

自己的屑屑自己清!

就算不想幫忙整理,自己製造的髒亂,請自行清乾淨,吸塵器用完,電源線也不要就插在插頭上不拔,可是很容易絆倒人的喔!
為了誘騙大家耐心看完有哪些地方要清理,內文中間有偷藏武功密輯(個人經驗心得)喔!ㄎㄎ


切記要機器停了才可以吸屑屑喔!銑刀在轉的時候最怕外力切入,一碰你就準備shopping新刀了!


台子上,墊底的材料上都算是明顯看得到的地方,相信大家都會清乾淨  


可是側邊藍色部份注意到了嗎?粉屑是不會放過任何一個地方的


 台子的下方,桌子邊緣也是很容易忘記的地方


 後方深處材料上也是有的


換個角度,從正後方來看,平台上都是,這是從正面吸不到的,要先把平台設定成view模式更好清,什麼是View模式?等等告訴你


刀架上,請小心清理


靠近我們的外側有屑屑,想當然爾,靠近牆面的內側也有屑屑!

還有地板也是要清一下喔~我自己是在工作前,先把CNC的台面上,一大堆有的沒有的東西都拿到電腦下方的架子,粉屑就不會沾在其他東西,增加清潔的份量,要偷懶就要先設想XD
感謝大家對機台的愛護,有好好照顧他,機器也會回饋,才不會動不動就當機喔~


現在進入正題,先設定XY軸,再設定Z軸,分開講是因為有一點小地方不一樣,要注意喔~


1.打開機台電源開關,在機台面對牆壁那一面,還要檢查跟電腦USB是否有連線妥當


2, Handy Panel畫面出現請你按Enter,按好等他開機一下下


3.一開機會預設在machine code的狀態,這樣是不能調整XY位置的,記得要改成User code,這裡是大家常常常常忘記的地方


4.按鍵盤上的Code system就可以改成用User來定義了


5.See~


6.按綠色X鍵,“>“在X軸,代表現在要移動X軸的位置


7.轉動圓盤,X軸會跟著移動,剛開始,千萬養成慢慢慢慢移動的習慣,沒有耐心,口袋就要有深度XD


8.把X軸移到物件的中央之後,按右上方的origin(被手指遮住了)


9.發現了嗎?X軸的數字變成O了!代表已經設定為原點


10.接下來,Y軸也是一樣的,先轉轉轉到物件中央,再按origin歸零


高度的Z軸可就不一樣了,如果不想噴錢,請仔細聽!

1.銑刀要用兩個板手固定上下方,再轉開,記得下方的手指要扶住銑刀


2.把圓圓的那個黃銅色的測量平台放在物件平坦的地方
按Z,然後慢~慢~用轉盤降低銑刀,直到離物件約1公分的高度


3.按鍵盤中間第一個按鍵,Z0 senior,聽到逼一聲即可


4.銑刀會自己下降到黃銅的平台上,一旦碰觸到平面就會自動往上“彈“昇,不要靠太近喔~
這樣就完成Z軸的設定了,是不是很簡單

“不需要“再去按Origin喔!


設定完之後,切記把黃銅圓台拿走,以免開始工作時,...恩,你知道的 


這樣設定好3軸之後,就可以去電腦開程式了,其實也是相當簡單,下集待續
***************************************************************

剛剛說要給秘技嘛~就是介紹 Handy panel 的 Menu 的用法
按右下角的Menu頁面
會有三個選項+回上頁
一樣是用轉盤選擇,確認按Enter

第一個是View,就是把整個工作平台往外推出,方便你黏貼物件,檢查物件切割狀況,以及清潔底部平台:-)


 View會讓工作平台往外推到底


User-XY跟Machine-XY指的就是把銑刀移到User或電腦設定的XY位置
這樣就可以確定我們當初設定的位置有無錯誤


切完了,也吸乾淨了


將刮刀放入物件下方任一角,再用鎚子輕輕敲開,就可以拆下來了


本來以為CNC很難操作,所以畫地自限,都不敢去學,實際花了時間看看操作手冊之後,發現真是超簡單的!大家也一起來玩吧!

2014年3月25日 星期二

How to convert 2D (.ai) files to 3D (.stl) files

Updated-
Thanks Sam's advice. It is much easier to use Rhino than Blender in this section, so I put the easier part in front to save time. However, it is recommended to have a look the whole article. Some detail may help.
Also, Thanks Sky helps me a lot and John checked each point!
______________________________________________________


To create your file as normal in Illustrator. Remember to set it in actual size.

Download Rhino ( Free beta version in Mac now!! Oh ya~)

Open your file.

Move mouth to commend line. Type "select all"


Type "group"


Type "extrude curve"


Set the value for height


Like this!


Export into .STL


Down!


______________________________________________________

When creating a complicated curve, people who is familiar with Illustrator and Photoshop might prefer to use the pen tool in 2D softwares than in 3D environment. In brief, you just need to save your vector file as a .svg file at 2D applications, then you should be able to import it at any 3D applications, extrude the height and export it as a .stl model. (*1)

It seems to be easy, however, things are never as smooth as I expected. After failed many many times, I would like to re-organgize the methods step by step with some tips. Hope it will be help for you.


Open your .ai file in Illustrator and check following steps to reduce the chance of failure when generating G-code.


1.Try to simplify anchor points. 
Using as less points as you can. Make sure there are NOT two points at the same place.


Some points are unnecessary.


Simplified path


2.The path cannot be overlapped. 
Once the curve has been extruded to a 3D model, overlapped path would become crossed faces. Of course, it cannot be printed out properly.


It looks fine in 150%


In fact, the curve is overlapped after zoom in.


3.Group all separate paths in once. 
Do not add extra filters or pathfinder. Do not group your design repeatedly.


Press "V" to select mode


"Ctr+A" to select all-->Press the R key-->"Group"


Releasing compound paths first if needed.  Press the R Key-->Release compound path


All above preparation are in avoid of failure when Slicer generating the G-code. This is what happened to me all the time. :-(


Save your vector files into .svg files


File-->Save as-->Format(drop box)-->SVG


Converting .svg files into .stl model files by Blender


1.Open Blender
Delete the default box.


Press the right mouse button to select the box.(the edge become orange means being selected.)--> Press speed key "X" to delete it.


2.File-->import-->svg files-->choose your file


It looks like nothing in the file. Don't worry. It is too small to see. Press the right mouse button to select the center of the screen. -->Press "S" n drag the mouse to enlarge it roughly. -->Press the left mouse button to confirm.


3.Change the origin of the object


When the object become seeable, you may notice that the origin is locked to the center of the screen, NOT in the center of the object. It is kind of annoying when setting exact size. Normally I will move it to the center of the object first. This is how we do:


Bottom line-->Object-->Transform-->Origin to center of the mass


Closer view


4. Set exact size


On the right side of screen-->choose the third icon "Scene"-->"Unit" --> "Metric"


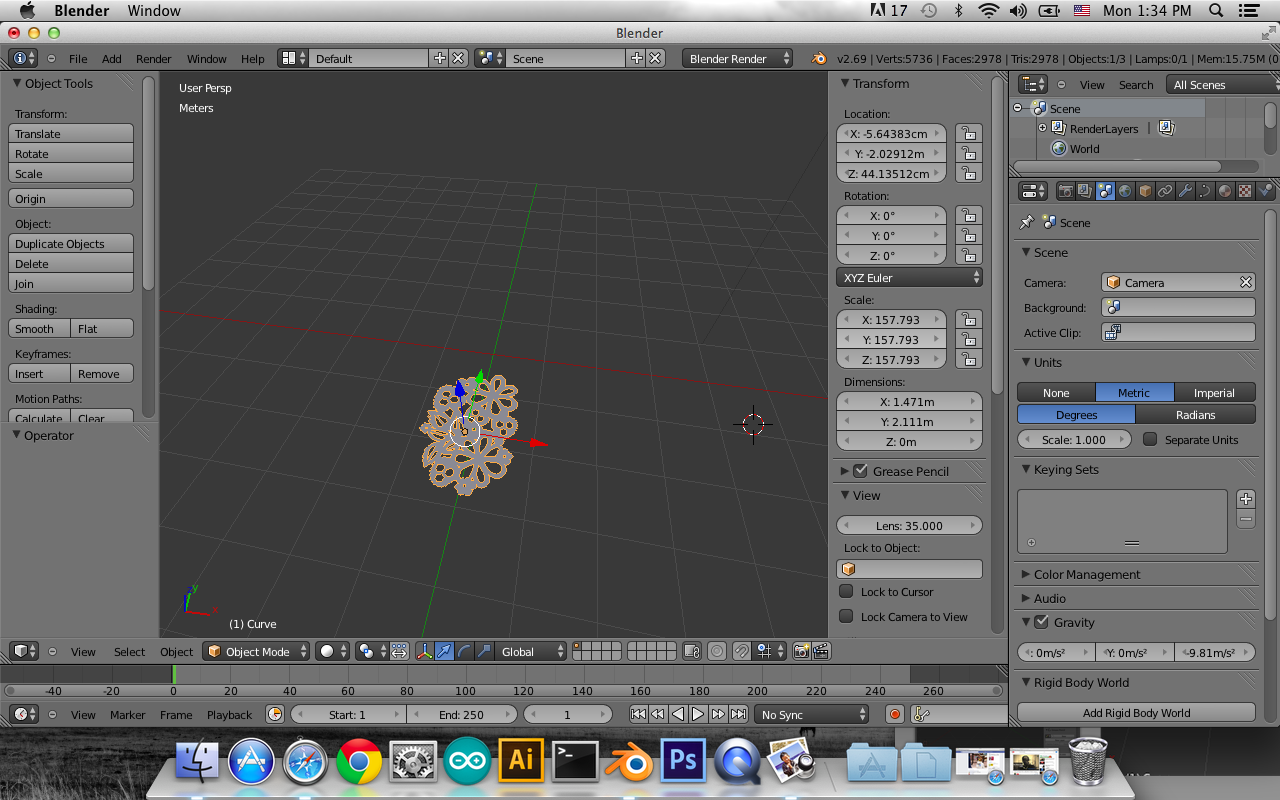
5. Press "N" on screen, "Transform" table will pop out 
The unit of dimension is "meter",  you could press the column and insert the size you want. However, 1 m = 1 cm in actual size in Slicer. Make sure you set the right size in X and Y axis. Z axis needs to extrude    first.  


6. Extrude the height


On the right side of screen-->choose " curve" -->Geometry-->Extrude


7. Convert curve to mesh
Select your object-->Press "Alt+C"-->Mesh from Curve/ Meta/ Surf/ Text
If the viewpoint shading is in "Solid",  we cannot see the difference. Just if you are interested, you may try the following steps to see the difference. 


The bottom line-->viewpoint shading changes from "Solid"  to "Wireframe"


Closer view of curve wireframe


Closer view of mesh wireframe
Now the top and bottom have been filled with faces.


8.File-->Export-->.stl file

Congratulation!!! Now your files are ready to be printed by 3D printer, or be cut by CNC finally.


Those tips are just my personal experience. I still don't fully understand some of them. If anyone would like to share your experience with me, you are more than welcome to leave comments! Let's MAKELEARN and SHARE


*1 Big thanks to these useful bloggers!
Reference:


http://www.katsbits.com/tutorials/blender/metric-imperial-units.php
http://www.instructables.com/id/A-Printed-Logo-Engineered-from-2D-into-a-3D-Object/step16/Image
http://www.youtube.com/watch?v=5EOQFzsLjKI&noredirect=1
http://wiki.blender.org/index.php/User:Rayek/Doc:2.6/Manual/Interface/Units